Sunday, December 27, 2009

Oven-Fried Chicken Parmesan


I have felt so guilty about not posting any blog entries in two weeks! What can I say, the holidays are a good excuse :) Well, now I gotta get back to it. I wish I had a more fun and creative recipe to share with you today, but there is a lot to be said for something classic, filling, and delicious - even if it isn't the most unique recipe in the world!

There are so many variations on "chicken parm" out there. Different spices, crumb coatings, cuts of chicken, marinara sauces. My intention in sharing this recipe with you is to give you something simple, quick, healthy, filling - and with no strings attached. This is chicken parm at its best, without bells and whistles.

We always use whole wheat pasta, and I'm convinced that once you've tried it, you'll never go back! The texture is totally different - it may be a big strange at first - but the health benefits are huge and you'll reach a point where plain white pasta noodles just taste...plain! We love whole wheat pasta and I'll never cook with anything else.

Enjoy! And Happy Holidays to you and your family!

Oven-Fried Chicken Parmesan

1/4 C flour
sprinkle of dried oregano + basil
pinch of salt + pepper
2 large egg whites, beaten
3/4 C bread crumbs
4 boneless chicken breasts
olive oil
1/2 jar marinara sauce
1 C mozzarella cheese
hot, cooked pasta

1. Preheat oven to 450. Using the flat side of a meat mallet, pound chicken breasts to 1/2 inch thickness.

2. Combine flour, seasonings, salt and pepper in a shallow dish. Place egg whites in a bowl. Place bread crumbs in a separate shallow dish. Dredge each chicken breast in flour mixture, then dip in egg whites, letting excess drip off. Then dredge in bread crumbs.

3. In large skillet, heat 1 TBS oil over medium-high heat. Add chicken breasts to pan and cook for 2 minutes on each side, adding another TBS of oil when you flip the chicken breasts. Place chicken in pan and place in the oven. Bake at 450 for 5 minutes. Turn chicken over, top with several TBS of marinara and cheese. Bake another 6 minutes, or until chicken is done.

4. Serve chicken breasts on top of hot, cooked pasta with additional sauce.


Sunday, December 13, 2009

Mini Reese's Cheesecakess

This dessert recipe is one of my most favorite EVER. I first made this in high school, when we needed to bring a dessert for a class function. Since that time, I've made these cheesecakes over and over...and over and over! Everyone loves them. They're addictive! When you first bite into one, you get that classic cheesecake flavor and texture. Take one more bite and you hit a crunchy, peanut-buttery, chocolate-y Reese's candy! To finish it all off, its made with a crunchy and buttery graham cracker crust. It seriously does not get any better than this.

That's all I can say about these little desserts - to find out more, try 'em yourself!

*note - as written, this recipe makes 6 cheesecakes. When I made these last week for a work holiday party, I quadrupled the recipe!

Mini Reese's Cheesecakes

1/3 C graham cracker crumbs
1 TBS white sugar
1 TBS butter, melted

8-oz pkg cream cheese, softened*
1/4 C white sugar
1.5 tsp lemon juice
1/2 tsp lemon zest
1/4 tsp vanilla extract
1 egg
mini Reese's peanut butter cups

1. Preheat oven to 325. Insert muffin liners into a muffin pan.
2. In small bowl, mix the graham cracker crumbs, sugar and butter. Place a tablespoon in the bottom of each muffin liner. Press down firmly. Bake in preheated oven for 5 minutes, then remove and cool.
3. Using an electric mixer, beat the cream cheese on its own for a minute or two until smooth. Add sugar, and beat until smooth. Add lemon juice, lemon zest and vanilla; beat until smooth. Mix in the egg and beat until smooth (sorry for sounding like a broken record...)
4. Pour cream cheese mixture into muffin cups using a small measuring cup or large spoon. Fill the cups 3/4 full. Unwrap your peanut butter cups and place in the center of the cream cheese filling, pressing down slightly.
5. Bake at 325 for 20 minutes. Remove from oven and refrigerate until ready to eat, or at least 2-3 hours.


*to soften, pleeeeease don't microwave your cream cheese. I haven't had the best of luck with this, as the cream cheese seems to lose some its creamy quality. I leave my cream cheese on the counter for 3-4 hours until its room-temperature. This will give you VERY smooth and creamy cheesecake.


Sunday, December 6, 2009

Slow-Cooker Jambalaya

Jambalaya is one of my favorite weekend meals. I love that it allows so much flexibility with ingredients and spices. On some occasions, shrimp sounds appealing whereas other times, I'm craving smoked sausage - the beauty of jambalaya is that you can use either, or both!! I love to load it up with tons of veggies, and as much spice as Brett and I can handle. With rice mixed in or served separately on the side - your pick! Today, I even chose to throw in an Anaheim pepper - for no reason other than, it sounded interesting. Not many recipes offer such an opportunity to have fun and be creative.

I've made jambalaya probably 3 or 4 times in the last several years. Tonight, it was definitely my best! Below is the exact recipe I used. I originally planned to serve the jambalaya alongside jasmine rice, but there was so much liquid in the crock pot that I decided to add dry rice during the last 20 minutes to soak it all up. It turned out perfect! I love this recipe in particular because it cooks in a crock pot, and how can you not love the "set-it-and-forget-it" mentality?! It filled the kitchen with delicious smells all day while I wrapped Christmas gifts.

Have fun with this one!

Slow-Cooker Jambalaya

1 lb boneless, skinless chicken breasts - cut into 1-inch cubes
1 lb smoked turkey sausage, sliced
28oz + 14oz can diced tomatoes, with liquid
1 large onion, diced
2 green bell peppers, diced
5-6 stalks of celery, diced
1 Anaheim pepper, diced
1 can chicken broth
oregano, parsley, garlic powder, cajun seasoning, cayenne, red pepper flakes, tabasco sauce
salt, pepper
2 C uncooked jasmine rice

1. In slow cooker, add all ingredients except uncooked rice. Estimate seasonings based on your tastes, and what looks right. You can always add more later. Set slow cooker to low for 5 hours.
2. Add uncooked rice after the 5 hours has run up. Flip slow cooker to high and cook for another 20 minutes, or until rice is tender.


Saturday, November 28, 2009

Crab Cakes with Aioli Sauce

Occasionally, I find myself with very odd cravings, and I'm sure you can all relate! Sometimes the cravings are pretty general - spicy food, for example. And sometimes, they are very specific - like Mi Ranchito's cream cheese chicken enchiladas!!

Most recently, I found myself craving seafood. I wanted something that I hadn't eaten in a long time - so no salmon or shrimp. And I wanted something that was a new recipe for me, since I love trying new things and posting them on my blog. I wanted something that wouldn't set me back too much money, since seafood is generally a bit higher-priced. I ending up finding a recipe for crab cakes that looked super easy and delicious - and since the recipe calls for canned crab, I knew it wouldn't be too expensive!

These crab cakes are totally awesome. Several reviewers on Allrecipes said that even though this recipe uses canned crab, it is so delicious, there's no reason to use fresh crab! These cakes are crunchy on the outside, yet soft and hot on the inside. Since they are baked and not fried, they are also surprisingly healthy. Served alongside a garlic-y homemade aioli sauce and mashed potatoes - it just doesn't get much better!

Crab Cakes with Homemade Aioli Sauce

8-12 green onions, chopped
3 (6-oz) cans canned crabmeat, drained well
2 eggs
3 TBS mayonnaise
3 tsp dry mustard
1 sleeve crushed Ritz crackers
1 tsp cayenne pepper
1 tsp garlic powder
pinch of other mixed seasonings - Old Bay or seafood seasoning
salt + pepper
bread crumbs (approx. 1 cup)

Aioli Sauce

3/4 C mayonnaise
2-3 cloves garlic, minced
2 TBS lemon juice
pinch of salt + pepper
1/2 tsp cayenne pepper (the best part! don't leave it out!)

1. For aioli sauce, mix all together and refrigerate.
2. Combine all ingredients except bread crumbs. Form into 1/2-inch patties. Roll patties in bread crumbs until coated.
3. Spray muffin pan with PAM. Divide crab mixture among muffin cups - depending on how large you want your patties, you may use between 6-10 muffin cups.
4. Bake at 350 for 20 minutes, until lightly browned and heated through. Serve with aioli sauce.


Thursday, November 19, 2009

Iced Pumpkin Cookies

My plan for the blog this week was to upload a crab-cake recipe. Buuuuttt...things change. You see, I've had these two cans of pumpkin in the pantry. I was convinced that somewhere out there, I could find a cookie recipe that called for canned pumpkin, with the remainder of ingredients being items I would already have in my pantry. I got lucky! I stumbled across this recipe on Allrecipes - not only did it meet my criteria, but it ALSO has 4.5 stars and has been rated by almost 30,000 people! Ahhh, the beauty of Allrecipes.

Let me just tell you - these cookies, well, they're a keeper. The reviewers online said things like, "super moist - more like cake!" and "reminds me of a muffin top." At first I wasn't so sure - I've been craving real cookies! But I am so happy that I gave this one a shot. I could tell while they were baking that they would be super pretty, because they keep their shape while baking, rather than flattening like a normal cookie. But only after they were done baking did I take the first bite - YUM! Full of pumpkin flavor with hints of nutmeg and clove. The "cookie" is super soft - in fact, I agree with reviewers that you shouldn't wrap this cookie up - leave it exposed to air, or very loosely covered, because it is SO moist that the icing will soften and run all over the cookie.

I highly recommend that you make these little guys as soon as possible!

Iced Pumpkin Cookies

2.5 C all purpose flour
1 tsp baking powder
1 tsp baking soda
2 tsp cinnamon
1/2 tsp ground nutmeg
1/2 tsp ground cloves
1/2 tsp salt
1/2 C butter, softened
1.5 C white sugar
1 can pumpkin
1 egg
1 tsp vanilla extract

Glaze
1.5 C powdered sugar
3 TBS milk
1 TBS melted butter
1 tsp vanilla extract

1. Preheat oven to 350. Combine flour, baking powder, baking soda, cinnamon, nutmeg, cloves and salt. Set aside.

2. In medium bowl, mix the 1/2 C softened butter + white sugar, using an electric beater. Add pumpkin, egg, and 1 tsp vanilla. Beat until creamy. Slowly mix in dry ingredients. Do not overmix. Drop onto greased cookie sheet by spoonfuls; press down slightly.

3. Bake for 15-20 minutes in the preheated oven. Let cookies cool. To make glaze, mix the four ingredients and drizzle over the cookies.


Sunday, November 15, 2009

Pizza Loaf !

This post is a fun one for me. Part of being my friend means occasionally letting me raid your cookbook/recipe collection. My friend Aimee subscribes to a cooking magazine called Taste of Home, and a couple months ago, I spent some time raiding her recipes from this magazine. One recipe she said I had to try was a "pizza loaf" - I was definitely intrigued! I wrote the recipe down and last week, decided to give it a go. Even before it was finished baking, I couldn't wait to eat it - you'll see why!

This recipe is a tiny bit tricky to put together but hopefully my directions help you through it. This is a perfect weeknight, dinner-in-front-of-the-TV meal. I also think it would work great as an appetizer if you're with friends. Be sure to serve it with a side of warm pizza sauce. This pizza loaf is piping hot on the inside with gobs of melted cheese and pepperoni. The crust is crunchy on the outside and doughy on the inside. It has become one of my new favorite recipes - sometimes its great to get away from more complicated recipes/ingredients and stick to something simple. I can't wait to make this again soon!!!

Pizza Loaf

2 packages of refrigerated crusty french loaf bread
1 TBS flour
1.5 C mozzarella
3/4 package pepperoni, finely sliced (apparently turkey pepperoni tastes just as good)
1 jar pizza sauce (I bought 2 because I love pizza sauce)
1 beaten egg white
2 TBS grated parm
italian seasoning

You will also need a rolling pin, counter space to roll the dough on, and a brush for the egg white, but a spoon would probably do just fine too.

1. Place one of the dough loafs on a floured surface. Using a sharp knife, make a lengthwise slit down the center to within half-inch of the bottom (don't cut all the way through!) Open dough so it lies flat. Sprinkle with a bit of flour on each side, so rolling pin doesn't stick. Roll into a 14"x5" rectangle. Repeat with 2nd loaf.

2. In a bowl, mix mozzarella and sliced pepperoni. Spread half of the mixture down the center of each loaf. Drizzle each loaf with 4-5 TBS of pizza sauce. Roll each loaf lengthwise into a log - HINT: this is tricky, so take it slow, because you log is probably very full! Pinch the sides of the log together to get it to hold its shape. Seal the seams on the ends, as well, by pinching together. Place each loaf, seam side down, on a baking sheet sprayed with PAM. Once the loaves are side-by-side, twist the loaves together 2-3 times - be careful that your loaves don't spill out their contents or break.

3. With a knife, make several shallow slashes on each loaf. Brush the entire loaf with egg whites. Sprinkle with parmesan and italian seasoning. Bake at 350 for 25 minutes. Cover with foil and bake another 4 minutes. Let stand for 10 minutes before slicing and serving. Serve with pizza sauce.


Monday, November 9, 2009

Turkey Croquettes with Spinach Potatoes

I love a good cookbook. I love old cookbooks, new cookbooks, celebrity cookbooks, homemade cookbooks. I love themed cookbooks - appetizers or drinks, for example. I love cookbook "guides" - The New Basics Cookbook is one on my shelf. I love itty bitty cookbooks with hard-to-find ingredients, and huge cookbooks in binders with every single ingredient in existence.

When I buy a cookbook or receive one as a gift, I read it cover to cover. I write down recipes and page numbers on a little card, that I then put in the front cover for future reference. I do this because, let's be honest - we all know that we won't use some recipes. That's ok. A cookbook, in my opinion, is like a set of photos - most will be just ok, but 5 or 6 will be total keepers, and you'll find yourself coming back to them over and over.

If there's one recipe I'm confident I will be making until I'm in a rocking chair, its this one. This recipe is from a Rachael Ray cookbook called "365: No Repeats" which I received as a gift from Brett's mom. I've made it twice now and the flavor is, well, incomparable. The pan drippings from the turkey croquettes make a to-die-for gravy - last week when I made this recipe, I literally ended up with the best gravy I have ever tasted (I was eating it with a spoon like soup.) The spinach potatoes are a perfect add-on. It sounds strange to put spinach into mashed potatoes, but you HAVE to do it! Its fantastic.

Enjoy!


Turkey Croquettes with Spinach Potatoes

3 large potatoes, peeled and cubed
1 lb ground turkey
2 celery ribs, finely chopped
1 small yellow onion, finely chopped
2 tsp poultry seasoning
dried thyme + parsely
salt + pepper
1 egg yolk
2 C bread crumbs
1/4 C olive oil
2 TBS butter
2 TBS flour
3 C chicken broth
1/2 C half and half (I buy fat free)
1/3 bag baby spinach, rinsed and patted dry

1. Place potatoes in a pot and cover with water. Salt the water and bring to a boil. Cook potatoes until tender.

2. While the potatoes cook, make the croquettes. Place the turkey in a bowl. Add celery, onions, poultry seasoning, the egg yolk, some dried herbs, and sprinkle with salt and pepper. Combine and form 8 patties. Coat both sides of the patties with bread crumbs.

3. Heat oil in large skillet over medium high heat. Cook the patties 5 minutes on each side. Remove croquettes from pan and keep warm. Reduce the heat to low. Add 2 TBS butter to the skillet and melt, then whisk in the flour. Cook the roux for a minute or two. Whisk in 2.5 cups of the chicken stock and bring to a boil. Thicken for a minute or so, and reduce heat to low. Taste the gravy and season with salt and pepper if needed.

4. Drain the cooked potatoes and return to pan. Add remaining 2 TBS butter, half cup of chicken broth, and the cream. Season with salt and pepper and mash. Fold in the spinach leaves until they wilt into the potatoes.
5. To serve, place the potatoes on a plate and place the croquettes on top. Spoon gravy over the dish.


Wednesday, November 4, 2009

Zuppa Toscana from Olive Garden

For as long as I can remember, one of my favorite Italian restaurants has been the Olive Garden. I love that the soup and salad have tasted the same for years (and by "the same," I mean - amazing!) I love the bright and warm atmosphere and the last few years, I have also come to love the Chianti =)

At work, I sit next to a very fun co-worker and sometimes we chat about what we've been cooking lately. A few weeks ago, she said she was making Zuppa Toscana. She said it like a true Italian (!) and I had absolutely no idea what it was! She said, "you know, the potato and sausage soup at Olive Garden." My reply? "NO WAY!" Immediately followed by, "I need that recipe!" I added it to the next week's menu list and wow, what a treat!

Brett likes to complain when I make soups, saying they don't fill him up, but he didn't complain about this one. It has 3 huge potatoes, a full pound of sausage, several strips of bacon....how can that not be a filling meal?!

Pour this into a big bowl, sit down for a good movie, and you've got yourself one good night!

Zuppa Toscana from Olive Garden

1 lb ground italian sausage
crushed red pepper, salt, pepper
1 large diced white onion
3-4 strips of bacon
3 garlic cloves, minced
10 C water
5 chicken bouillon cubes
1 C heavy cream
3 large potatoes, sliced or diced
small bunch of kale

1. Sautee sausage and crushed red pepper in large pot. Season with salt and pepper. In same pan, sautee bacon.
2. You should have a fair amount of fat left in the pan to now sautee your onion. Sautee onion about 10 minutes. Add garlic, and sautee another minute or two. If the onion/garlic begin to burn at any point, add a few tablespoons of water to the pan.
3. Add chicken bouillon cubes and water. Heat to boiling.
4. Add potatoes and cook until soft, about 20-25 minutes.
5. Add heavy cream and heat through.
6. Place a small amount of kale in the bottom of your serving bowls, and add soup.

Enjoy!


Tuesday, October 20, 2009

Chicken with Lemon and Caper Sauce

Something about cooking that I love is trying recipes that include new, somewhat unknown ingredients. In this recipe, I used two of those ingredients - capers and kale. I've definitely used capers once or twice in the past but the other day I got to thinking, "what exactly IS a caper?" Is is a seed? A legume? A bean? A vegetable? And as for kale, what sort of leaf is it? Is it from a plant? A bush? A flower? A tree? There were so many unanswered questions!!

Well, I just went googling for some answers. Capers, I've discovered, are actually unripened flower buds (who knew?!) The plant is native to the Mediterranean and some parts of Asia, and capers have been mentioned in literature dating as far back as 3000 BC.

Kale is a bit closer to home (Europe and North America.) It is the most robust cabbage type, known to be more hardy than any other vegetable. I also learned that it's extremely healthy for you, being full of antioxidants and anti-inflammatory properties.

The best part, in my opinion? Although these ingredients may not be pantry staples, they are both delicious and full of flavor. They bring a new element to an otherwise common dish (chicken) and using new ingredients like these will ensure that home cooking doesn't get boring. I think its important to challenge yourself with something other than everyday ingredients.

(and for the record - this recipe is one of my new favs - super easy and tasty!)


Chicken with Lemon Caper Sauce

4 boneless, skinless chicken breasts
salt + pepper
3 TBS flour
2 TBS olive oil
3/4 C chicken broth
juice of one lemon
2 TBS capers, drained
3 TBS chopped kale

1. Place chicken between two sheets of plastic wrap, and pound to an even thickness using a meat mallet (if you don't have one, invest in one!!! It's priceless!) Sprinkle chicken with salt and pepper. Place flour in a shallow dish and dredge chicken in flour.

2. Heat oil over medium high heat. Add chicken to pan. Cook 4 minutes on each side. Add broth, lemon juice and capers to pan. Reduce heat to medium and simmer 5-7 minutes. Sprinkle chicken with kale.

3. Remove chicken from pan and set aside. Bring sauce to a boil and cook several minutes until slightly thickened. Return chicken to pan to heat through. Serve chicken with sauce drizzled over it.

Note - goes perfectly over wild rice because the sauce coats the rice and it's delish :)


Vegetable Meatloaf with Balsamic Glaze

This past weekend, I took a major - and I mean major! - step out of my comfort zone. You see, as long as cooking has been a hobby of mine (so...about five years,) I have trusted one meatloaf recipe, and one only. It can be found in my very first blog post, and its called Brown Sugar Meatloaf. I've never strayed from it, though I've been tempted!

While going through my little black box of cards containing recipes dating back to my first cooking magazine, I stopped at a brand new meatloaf recipe - "Vegetable Meatloaf with Balsamic Glaze." Several thoughts went through my head: "I've got a ton of balsamic in the pantry that needs to be used. I can't cheat on my old meatloaf. This recipe is loaded with tons of veggies and its so colorful! I can't cheat on my old meatloaf. Oh, the glaze looks so yummy! I can't cheat on my old meatloaf."

Eventually, I gave in. At first, the finished recipe was hard for me to get used to - I'm so accustomed to the sweet taste of Brown Sugar Meatloaf, whereas this one is very tart, thanks to the balsamic. The texture is different as well, because the chopped veggies are so loaded with moisture, that the meatloaf doesn't hold its shape quite as well as others. I think the most rewarding aspect of trying this new meatloaf was Brett's reaction - he loved it!!! He even said, "I am obsessed with it!" after eating 4 helpings for lunch the next day.

So, there you have it. I've betrayed my one and only meatloaf recipe...and it paid off! Here's to always trying new things, but keeping the old favorites close to your heart.


Vegetable Meatloaf with Balsamic Glaze

extra virgin olive oil
3 bell peppers, finely chopped (use different colors!)
4 cloves garlic, minced
1/2 tsp red pepper flakes
salt and pepper
1 large egg
dried herbs such as thyme and parsely
1.5 lb ground turkey meat
1 C panko/breadcrumbs
1/2 C grated parmesan
1/2 C ketchup + 1/4 C ketchup
1/4 C + 2TBS balsamic vinegar

1. Preheat oven to 425. Heat oil in large pan and add chopped peppers. Sautee for 7-8 minutes, until tender. Add red pepper flakes and garlic. Sautee another 2 minutes. Season with salt and pepper and set aside to cool.

2. Whisk egg and herbs in bowl. Add turkey, panko, cheese, 1/2 C ketchup, 2 TBS vinegar and vegetable mix. Mix well (with your hands, if you're brave!)

3. Gently press the mixture into a 9x5 loaf pan. Whisk the remaining 1/4 C ketchup, 1/4 C balsamic and a sprinkle more of red pepper flakes. Brush this mixture over the meatloaf. Bake for 1 to 1 1/4 hours. Let rest for 10 minutes before slicing.


First, the delicious glaze:


The (very colorful) finished product:


Sunday, October 18, 2009

Downeast Maine Pumpkin Bread

I adore Fall. If you asked me to name 100 things that I love about Fall, I could definitely do it - some of the things topping my list are....pulling out the sweaters + boots, drinking hot cocoa in my favorite pair of sweatpants, the leaves turning a vibrant orange, chilly winds that clear my mind after a stressful day at work, jumping onto crunchy leaves on the sidewalk, corn mazes, getting ready for holidays, and - without a doubt - anything pumpkin!!!

I've made this pumpkin bread recipe two years in a row. I wouldn't say that its "to die for" and I won't stop at this recipe with the belief that there's nothing better out there (my creamy tomato soup, now, that's another story - no more searching is needed!) That said, how can pumpkin bread NOT be good? With that awesome cinnamon-y, pumpkin-y, nutmeg-y, clove-y flavor, it's a Fall recipe through and through. Like so many other quick bread recipes, this one makes two good-sized loaves and freezes well. Enjoy, and HAPPY FALL!!!


Downeast Maine Pumpkin Bread

1 (15 oz.) can pumpkin
4 eggs
1/2 C vegetable oil
1/2 C unsweetened applesauce
1 tsp vanilla
2/3 C water
2.5 C white sugar
3.5 C all-purpose flour
2 tsp baking soda
1.5 tsp salt
1 tsp cinnamon
1 tsp nutmeg
1/2 tsp ground cloves
1/2 tsp ground ginger

1. Preheat oven to 350. Grease and flour 2 loaf pans.
2. In medium bowl, mix flour, baking soda, salt, cinnamon, nutmeg, cloves and ginger.
3. In separate large bowl, mix pumpkin, eggs, vegetable oil, applesauce, vanilla, water and sugar.
4. Stir the dry ingredients into the moist ingredients and mix just until blended. Do not overmix.
5. Pour batter into prepared pans and bake for 50 minutes, or until toothpick inserted in center comes out clean.


Sunday, October 11, 2009

Maple Salmon

Generally I do my weekly grocery shopping at Wal-Mart - unless I need to get something from the meat counter or fresh seafood. A few weeks ago, while looking in the frozen fish section at Wal-Mart, I found a package of frozen Wild Alaskan salmon, on sale for $4 (for 4 small filets.) I thought this price was very reasonable and later that night, baked the salmon with salt, pepper and lemon juice. I was so surprised - it was excellent!! I grabbed my second bag of this salmon today while shopping, and found a recipe on Allrecipes for maple salmon.

This salmon is great because the glaze is sweet and salty at the same time. I was worried about the fact that I wasn't using real maple syrup (real maple syrup runs about $6-$8 per bottle - no thanks!) but as it turns out, this didn't matter...the sweet maple flavor was delicious. This is also a dish you can feel good about eating - it is jam-packed with Omega 3 oils. Salmon has more omega 3 oils per ounce than any other "common seafood," with the exception of herring. And with the many health benefits of Omega 3's (heart/joint/brain health), how could you not feel good about eating this yummy dish for dinner?!

Maple Salmon

1/4 C maple syrup
2 TBS soy sauce
1 clove garlic, minced
1/4 tsp garlic salt
pinch of ground black pepper
1 lb fresh or frozen (thawed) salmon filets

In shallow dish, whisk syrup, soy sauce, garlic, garlic salt and pepper. Place salmon in dish. Marinate in fridge for 30 minutes, turning once.

Heat oven to 350. Bake salmon 15-20 minutes, until flakes easily with a fork.

(I served with a baked potato and roasted zuchinni/squash. The zucchini/squash works perfectly because it bakes in the same amount of time/temperature as the salmon.)


Sunday, October 4, 2009

Creamy Chicken Enchildas

This recipe sticks out in my mind for one reason in particular. Last year, I was invited to a bridal shower for one of my college friends named Morgan. The shower was themed around kitchen items and recipes, so each guest was asked to fill out a recipe card with one of their favorite recipes. Now, you have to understand that to ask ME to choose a favorite recipe - well, its not possible. So I had to think beyond my favorite. I had to think, "what is something fairly easy and quick to prepare? Something full of flavor, filling and with readily available ingredients? Something a new bride can make her new husband to put a big smile on his face? A recipe to save for the long run and possibly make for kids down the road?" The answer....these creamy chicken enchiladas. I'm not sure if Morgan has made this recipe yet but I need to ask her the next time I see her!

In some ways, the word "enchilada" is misleading for this recipe. "Enchilada" implies a spicy red sauce, right? Well, this dish has no red sauce - instead, its a creamy sauce that reminds me of the sour cream chicken burrito at On the Border. Whatever name you want to give it, you just have to try it - its amazing!


Creamy Chicken Enchiladas

1 TBS butter
1/2 C chopped green onions
1/2 tsp garlic powder
1 4-oz can chopped green chiles
1 can cream of mushroom soup
1/2 C sour cream
3 chicken breasts, cooked* and diced
1.5 C shredded cheddar cheese
4 large flour tortillas
1/4 C milk
cayenne, salt, pepper


1. Preheat oven to 350. Spray small casserole pan with PAM.

2. In small saucepan, sautee green onion in butter. In medium bowl, mix green onion, garlic powder, green chiles, mushroom soup and sour cream. Add a pinch of salt, pepper and cayenne.

3. In separate medium bowl, take 1/4 of the creamy mixture and add diced chicken. Mix well.

4. In each flour tortilla, sprinkle 1/4 C cheese in the middle. Top with chicken mixture. Roll up and put into the prepared pan.

5. Mix 1/4 C milk into the remaining creamy mixture. Pour this over the flour tortillas. Top with remaining 1/2 C cheese.

6. Cover with foil and bake for 30 minutes.

*I find the easiest method for this recipe is to trim the fat off of the raw chicken and boil in boiling water for 10-12 minutes, until no longer pink inside


Thursday, October 1, 2009

Zucchini Bread

(Side note - I just realized that my last four posts have featured either pesto or zucchini...jeez, I need to mix it up!! I will next time, promise!)

Now onto that zucchini bread....

I really wish the pictures below of my faaaaaavorite zucchini bread would do this recipe justice. This bread is everything a good bread should be - incredibly moist, super easy to bake, relatively healthy (it has three zucchinis in it!!) and it bakes two good-sized loaves, so you can freeze one for later. It keeps well in the fridge, and goes perfectly either as a late night snack, or for breakfast at work. Do the pictures below tell us all those good things? No way! Suffice it to say, you should definitely try this recipe out.


A few words about the ingredients. You can make this bread with or without walnuts, depending on your preference. Also, the original recipe calls for 1 cup vegetable oil; please, please please use my suggestion below, and do 1/2 C vegetable oil and 1/2 C applesauce. It tastes idential (seriously!) and cuts out half the bad fat. Some cooks swear by applesauce in their breads...maybe I am becoming one of them!

Finally, its important to note that for the lightest, fluffiest cakes, breads and muffins...do not overmix your batter!!! I don't claim to be an expert, but everything I read and hear says that as SOON as your batter is somewhat combined (in terms of wet + dry ingredients,) STOP mixing! The more you mix, the more stiff the batter becomes, and the bread's texture will suffer.

Perfect for fall, and truly one of the most yummy breads around, I now present this amazing Zucchini Bread!

Zucchini Bread

3 C all purpose flour
1 tsp salt
1 tsp baking powder
1 tsp baking soda
3 tsp ground cinnamon
3 large eggs
1/2 C vegetable oil
1/2 C unsweetened applesauce
1 C white sugar
1 C packed brown sugar
3 tsp vanilla extract*
3-4 C grated zucchini (= 3 medium zucchinis)
1 C chopped walnuts (more/less/none)

*I use Neilson-Massey Madagascar Bourbon vanilla from Williams-Sonoma...Brett's mom bought it for me awhile ago and I will never go back!

1. Grease and flour two 8x4 inch pans. Preheat oven to 325.
2. Sift flour, salt, baking powder, baking soda and cinnamon together in bowl.
3. In separate bowl, beat eggs, oil, applesauce, vanilla, brown sugar and white sugar together. Add dry sifted ingredients (one cup at a time) to the wet mixture. Mix until combined (I used an electric mixer.) Fold in zucchini and walnuts with a spatula. Pour batter into prepared pans.
4. Bake for approx. 55 minutes, until a toothpick inserted in the center comes out clean. Cool in pan before slicing.


Monday, September 21, 2009

Pesto-Stuffed Pork Chops

Let's take a step back to the pesto recipe which I posted last week. I already went on and on about why I decided to make homemade pesto and how delicious it turned out. Here is a recipe that you can use in conjunction with the pesto - and its just about one of the most awesome pork chop recipes ever!

This is one of those recipes that takes quite a bit of time to put together, so save it for a weekend. While it's not hard to create a pocket in the pork chop for the filling, you want to go slowly to ensure that you don't pierce through any part of the meat. It also needs to bake for quite a while so overall, its not a super simple and quick meal. But, once your hard work is finished, you're left with quite a beautiful presentation and a delicious dinner!

I served this with potato and onion casserole and it was simply divine!

Pesto-Stuffed Pork Chops

3 TBS crumbled feta cheese
3 TBS basil pesto (store bought, or see recipe below)
4 boneless thick pork chops (buy the thickest chops that you can find)
salt, pepper
drizzle of balsamic vinegar

1. Trim fat from meat. With a sharp paring knife, make a pocket in each pork chop by cutting horizontally into one side of the meat. Make an incision as deep as possible, without piercing the other side of the meat.

2. Stuff each pork chop with feta and pesto. You can secure if necessary with a toothpick. *Note: I found it easiest to lay the pork chops in a row, with each pocket opening tilted upwards on the next pork chop, so the filling wouldn't fall out. For the pork chop on the end, I simply rolled up a piece of foil and place it beneath the pocket opening. See picture below.

3. Sprinkle each pork chop with salt and pepper. Place chops in a shallow pan and bake uncovered at 375 degrees for 35-40 minutes or until juices run clear. Brush each chop with balsamic vinegar before serving.


Monday, September 14, 2009

Easy Pesto

Yesterday morning while planning out meals for the next week, I began looking through the 12th Edition of Better Homes and Gardens Cookbook. I already had a meal with chicken written on my weekly list, so I was looking for something with either pork or beef. I happened to see one recipe called "Pesto-Stuffed Pork Chops." I did a quick read-through to see if this recipe was something I wanted to try out...and it sounded amazing!

Conveniently, one of the items on my to-do list this weekend was to freeze some basil from my overgrown basil plant. Since pesto's main ingredient is basil, and I have wayyyy too much on hand, the thought of making homemade pesto -and then using it for my pork chops - sounded ideal.

I found this pesto recipe online. I wasn't sure how to compare pesto recipes, but I found one reviewer on Allrecipes who had tested several pesto recipes, and this was her favorite. This recipe also called for almonds rather than pine-nuts, so I thought "what the heck?"

Turns out, this pesto is super yummy!!! Very garlic-y (that's a good thing) with a great texture. I will post the pesto-stuffed pork chops in the next week or so but for now, this pesto deserves its own post. And, pesto can be used on all kinds of things - bruschetta, pasta, pizza, etc. I wouldn't recommend that you try this recipe unless you have a basil plant, or can borrow from someone else's basil plant. My reason for saying that is, it took nearly 2 full cups of basil leaves to yield about 1/3 C of pesto. While that was great for my purposes, it is a lot to spend if you're buying basil leaves at the store, which run about $3-$4 for a tiny bit.

Have fun!

Easy Pesto

1/4 C slivered almonds
3 cloves garlic
1.5-2 C fresh basil leaves, washed
1/3 to 1/2 C olive oil
1 pinch ground nutmeg
salt and pepper

1. Lightly toast almonds in skillet over medium heat (put into a dry skillet.) Watch carefully - nuts burn easily.
2. In a food processor*, blend almonds, garlic, basil, olive oil, nutmeg and salt and pepper until it reaches a pasty consistency.

*I do not have a large 9- or 12-cup food processor, I only have a mini food processor so I made my pesto in two batches (you better believe I am putting a large processor on my wedding registry :) )

Note: The original recipe calls for 1/2 C oil, but I didn't want my pesto super oily since it would simply run off the pork, so I used less. Depending on your recipe, you may want the full amount of oil.

Another note: feel free to subsitute pine nuts for a more traditional pesto, or add sundried tomatoes, other herbs, parmesan, etc.


Saturday, September 12, 2009

Fried Zucchini

You see, I have these two friends named Aimee and Heather. They're both a little crazy, just like me, so we get along great :) Whether its building a home for Habitat for Humanity, sipping wine while gossiping, or trying to find the perfect outfit for a date/event, we seem to have a simply wonderful time whenever we're together.

For my 23rd birthday, Aimee and Heather got me a gift that they just knew I would love - and the second I opened it, I knew it would someday end up on my blog :-) They chose a cookbook by Giada De Laurentiis, one of the most beautiful italian cooks ever featured on the Food Network. And what could fit more perfectly with a cookbook, than a gorgeous glass and stainless steel cookbook holder from William Sonoma?


While Giada's cookbook is full of yummy pasta recipes, one recipe caught my eye because I've always wanted to make it - fried zucchini. According to the book, fried zucchini is served on the streets of Naples...which really makes me want to take a trip to Naples!! You can also make this recipe using sweet potato slices, carrots, broccoli, cauliflower, peppers, etc.

Aimee and Heather, thanks for the awesome birthday gift!! Here's to many scrumptious Italian dishes in the near future <3

Fried Zucchini

1 3/4 C freshly grated Parmesan cheese
1 1/2 C panko (Japanese bread crumbs - right next to bread crumbs at the store)
salt + pepper
2 large eggs
3 medium zucchini, cut into strips
olive oil, for frying

1. Mix the parmesan cheese, panko, salt and pepper in a low dish. In a separate dish, whisk eggs. Working in batches, dip the zucchini sticks in the egg mixture so that they are coated completely. Then dip the zucchini in the panko mixture, patting them to ensure the breading has adhered to the zucchini.

2. Heat 1-2 inches of olive oil in large pan. Working in batches, fry the zucchini sticks until they are golden brown. Use a slotted spoon to transfer to paper towels and drain.

3. Arrange on platter and sprinke with addtional Parmesan cheese, if desired.


Fierro Chicken

I know, I know, its been too long since I made a blog post! Things have been pretty crazy with Labor Day weekend, etc. So, today I will post two :-)

This recipe is called Fierro Chicken. I pulled it off of All Recipes, and I was intrigued because it looked very simple, and had good ratings (4.5 stars.) I generally only pull recipes off of All Recipes if they have ratings at or above 4 stars, because then I can be sure that many people have made the recipe and "tweaked" it to be more flavorful or more healthy. This recipe is a great example - while the original recipe calls for heavy cream, many reviewers had perfect success with fat free half and half. So, that's what I used and yup, tasted delicious :-)

I'm sorry the picture below isn't more appetizing. With something covered in so much delicious sauce, well, its hard to take a good photo! Brett loved the extra sauce mixed into the mexican rice which I served on the side.

Enjoy!

Fierro Chicken

5 oz cream cheese, softened
1.5 C shredded cheddar cheese
1 4-oz can chopped green chiles
1 TBS chili powder (I used more + added cayenne)
3/4 C enchilada sauce
3/4 C fat free half and half
4-6 boneless, skinless chicken breasts
[the original recipe also called for 6 sliced button mushrooms but I omitted]
salt, pepper, cooking spray

1. Preheat oven to 350. Spray a small casserole dish with cooking spray. Season chicken breasts with salt and pepper.
2. Mix all ingredients well, except the chicken.
3. Place chicken in the casserole pan, and cover with sauce. Bake in preheated oven until juices run clear, about 40 minutes
.


Monday, August 31, 2009

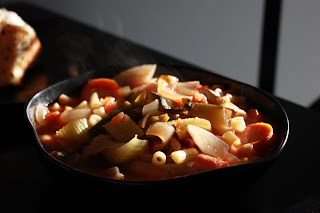
Jamie's Minestrone


Now presenting, the first soup from my kitchen of Fall/Winter 2009!!

Last week, I found myself with an abundance of leftover fresh veggies - and a strong craving for something warm, hearty and filling! I also felt like several of my meals recently have been pretty high in animal fats, so I was hoping to come across a recipe that didn't include any meat. (Before you start bashing that idea, try the Greek Pasta recipe - no meat, and still totally to-die-for!) While browsing through Allrecipes, I happened to find something called "Jamie's Minestrone." At first glance, the ingredient list looked long - then I realized that I already had half the vegetables on my counter! I knew this soup would be awesome from the minute I decided to try it out.

I'm pretty strict about my grocery budget, and this recipe really reiterates how
cheap fresh produce actually is. I spent hardly anything on this meal - and it makes about 8 big bowls of soup! That is cost-efficient cooking, in my opinion :-) We ate this with plain garlic bread and it was very filling...one bowl and I'm stuffed!

Quick disclaimer - the reviews of this recipe online are full of creative things to include in this soup - you should by no means feel limited to only include what is here! Some people added yellow squash, red potatoes, different beans, italian crushed tomatoes, etc. The original recipe here actually calls for red wine, cabbage and spinach to be added.
Here's to a season full of delicious soups....enjoy!

Jamie's Minestrone

3 tablespoons olive oil
3 cloves garlic, chopped

1 large onion, chopped

4 celery stalks, chopped

3 carrots, sliced

2 cups chicken broth*

2 cups water*

28-oz can crushed tomatoes

1 cup canned kidney beans, drained

1 (15 ounce) can green beans, drained

large zucchini, quartered and sliced

1 tablespoon chopped fresh oregano

2 tablespoons chopped fresh basil

salt and pepper to taste

1/2 cup Ditalini pasta (small macaroni shells if you can't find Ditalini)


*Note - I used 4 cups water with 2 chicken bouillon cubes


1. In a large pan (your entire soup will go in this pan!,) saute onion until translucent. Add garlic and cook one more minute. Remove from pan and set aside. Add carrot, celery and zucchini to pan. Saute for 5-6 minutes.


2. Add chicken broth, water and crushed tomatoes. Bring to a boil, stirring frequently. Reduce heat to low and add kidney beans, green beans, herbs, salt and pepper. Simmer for 45 minutes.


3. In separate pan, cook Ditalini as instructed on package. Drain well.


4. To serve, place a small amount of pasta in bowl, and ladle soup over pasta. (note - do not add cooked pasta directly to soup; if you have leftovers, the pasta gets very soggy in the soup.)


Sunday, August 23, 2009

Beef Stroganoff

Sometimes, I'm in the mood to steer clear of fancy, unique dishes and go back to the old classics. To me, old classics include things like pot roast, chicken and noodles, lasagna...dishes that people all over have been making for decades! This recipe is pulled from Cooking Light (April 2007) and its something I've made a couple of times before - and it is sooo delicious. It has a history of its own, as well - according to cooking light, "legend has it [that] this dish was created for 19th-century Russian general Count Alexander Stroganov, and it eventually became a dinner-party standby for American home cooks in the 1950s and 1960s." Given my interest in history, this seems the perfect dish to feature on this week's blog post!

The reason I like this dish is because of the simple combination of flavors - the egg noodles are fairly bland, but that's a good thing - they end up coated in a yummy sauce anyway, and the beef/mushroom mixture is very flavorful. The sherry cooking wine adds a bit of "delicate" flavor - which is important since the beef broth and sour cream are very rich! This recipe is also fast and easy to make - and leftovers heat up perfectly for lunch the next day!

Beef Stroganoff

1lb boneless sirloin steak, with fat trimmed off
8 oz mushrooms, sliced
small onion, chopped
1 TBS butter
olive oil
2 TBS flour
1 C beef broth
1/4 C sherry cooking wine
salt + pepper
3/4 C low fat sour cream
cooked egg noodles (use the whole 8-oz package)
fresh minced parsley

1. Cut beef into small strips.
2. Heat several TBS olive oil in skillet. Add beef and saute until lightly browned, 3-4 minutes (don't cook all the way through yet.) Remove beef from pan and set aside.
3. Add onion to pan. Saute 2 minutes. Add mushrooms to pan. Saute both onion and mushrooms for another 2-3 minutes. Remove from pan and set aside with beef.
4. Melt butter in pan over medium-high heat. Add flour. Cook one minute. Add sherry, and whisk for one minute until clumps are broken up. Add broth. Cook one minute until sauce is thickened and bubbly, stirring constantly.
5. Add beef/mushrooms/onions to sauce. Season with salt and pepper. Bring all to a boil. Then reduce heat and let simmer for 4-5 minutes. Remove from heat, and add sour cream.
6. Combine cooked noodles with parsley. Serve beef mixture over noodles.


Note - I roasted a few sliced green bell peppers in the oven (drizzled with olive oil, salt, pepper) and served on the side.