Monday, August 31, 2009

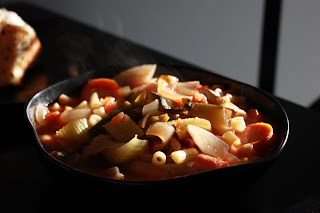
Jamie's Minestrone


Now presenting, the first soup from my kitchen of Fall/Winter 2009!!

Last week, I found myself with an abundance of leftover fresh veggies - and a strong craving for something warm, hearty and filling! I also felt like several of my meals recently have been pretty high in animal fats, so I was hoping to come across a recipe that didn't include any meat. (Before you start bashing that idea, try the Greek Pasta recipe - no meat, and still totally to-die-for!) While browsing through Allrecipes, I happened to find something called "Jamie's Minestrone." At first glance, the ingredient list looked long - then I realized that I already had half the vegetables on my counter! I knew this soup would be awesome from the minute I decided to try it out.

I'm pretty strict about my grocery budget, and this recipe really reiterates how
cheap fresh produce actually is. I spent hardly anything on this meal - and it makes about 8 big bowls of soup! That is cost-efficient cooking, in my opinion :-) We ate this with plain garlic bread and it was very filling...one bowl and I'm stuffed!

Quick disclaimer - the reviews of this recipe online are full of creative things to include in this soup - you should by no means feel limited to only include what is here! Some people added yellow squash, red potatoes, different beans, italian crushed tomatoes, etc. The original recipe here actually calls for red wine, cabbage and spinach to be added.
Here's to a season full of delicious soups....enjoy!

Jamie's Minestrone

3 tablespoons olive oil
3 cloves garlic, chopped

1 large onion, chopped

4 celery stalks, chopped

3 carrots, sliced

2 cups chicken broth*

2 cups water*

28-oz can crushed tomatoes

1 cup canned kidney beans, drained

1 (15 ounce) can green beans, drained

large zucchini, quartered and sliced

1 tablespoon chopped fresh oregano

2 tablespoons chopped fresh basil

salt and pepper to taste

1/2 cup Ditalini pasta (small macaroni shells if you can't find Ditalini)


*Note - I used 4 cups water with 2 chicken bouillon cubes


1. In a large pan (your entire soup will go in this pan!,) saute onion until translucent. Add garlic and cook one more minute. Remove from pan and set aside. Add carrot, celery and zucchini to pan. Saute for 5-6 minutes.


2. Add chicken broth, water and crushed tomatoes. Bring to a boil, stirring frequently. Reduce heat to low and add kidney beans, green beans, herbs, salt and pepper. Simmer for 45 minutes.


3. In separate pan, cook Ditalini as instructed on package. Drain well.


4. To serve, place a small amount of pasta in bowl, and ladle soup over pasta. (note - do not add cooked pasta directly to soup; if you have leftovers, the pasta gets very soggy in the soup.)


Sunday, August 23, 2009

Beef Stroganoff

Sometimes, I'm in the mood to steer clear of fancy, unique dishes and go back to the old classics. To me, old classics include things like pot roast, chicken and noodles, lasagna...dishes that people all over have been making for decades! This recipe is pulled from Cooking Light (April 2007) and its something I've made a couple of times before - and it is sooo delicious. It has a history of its own, as well - according to cooking light, "legend has it [that] this dish was created for 19th-century Russian general Count Alexander Stroganov, and it eventually became a dinner-party standby for American home cooks in the 1950s and 1960s." Given my interest in history, this seems the perfect dish to feature on this week's blog post!

The reason I like this dish is because of the simple combination of flavors - the egg noodles are fairly bland, but that's a good thing - they end up coated in a yummy sauce anyway, and the beef/mushroom mixture is very flavorful. The sherry cooking wine adds a bit of "delicate" flavor - which is important since the beef broth and sour cream are very rich! This recipe is also fast and easy to make - and leftovers heat up perfectly for lunch the next day!

Beef Stroganoff

1lb boneless sirloin steak, with fat trimmed off
8 oz mushrooms, sliced
small onion, chopped
1 TBS butter
olive oil
2 TBS flour
1 C beef broth
1/4 C sherry cooking wine
salt + pepper
3/4 C low fat sour cream
cooked egg noodles (use the whole 8-oz package)
fresh minced parsley

1. Cut beef into small strips.
2. Heat several TBS olive oil in skillet. Add beef and saute until lightly browned, 3-4 minutes (don't cook all the way through yet.) Remove beef from pan and set aside.
3. Add onion to pan. Saute 2 minutes. Add mushrooms to pan. Saute both onion and mushrooms for another 2-3 minutes. Remove from pan and set aside with beef.
4. Melt butter in pan over medium-high heat. Add flour. Cook one minute. Add sherry, and whisk for one minute until clumps are broken up. Add broth. Cook one minute until sauce is thickened and bubbly, stirring constantly.
5. Add beef/mushrooms/onions to sauce. Season with salt and pepper. Bring all to a boil. Then reduce heat and let simmer for 4-5 minutes. Remove from heat, and add sour cream.
6. Combine cooked noodles with parsley. Serve beef mixture over noodles.


Note - I roasted a few sliced green bell peppers in the oven (drizzled with olive oil, salt, pepper) and served on the side.


Sunday, August 16, 2009

Famous Pork Chops

Call me crazy, but I think its fun to try out different breadings - canned bread crumbs just get a bit old, in my opinion! In college, I discovered "Panko" - i.e. Japanese bread crumbs. Whereas normal bread crumbs can get somewhat soggy and are extremely fine - almost like sand - Panko has a lot of crunch and is made of bigger morsels. A few weeks back, I made chicken with cornflakes and was surprised at not only the crunchy breading but also the nice brown color. And this week, when making these pork chops, I used a totally new "breading" - Ritz crackers!!! The result? Buttery, crunchy, and delicious. And yes, you can totally taste the Ritz!

I made these pork chops with broccoli and creamed corn. It sounds good on paper, but as soon as I sat down to eat, I was slightly disappointed - the ONE thing this recipe was missing was some homemade gravy!!! I almost couldn't believe that I had overlooked it. And, although the pork chops were deliciously juicy, tender and flavorful - mashed potatoes and gravy on the side would have made this a 5-star dish.

Lesson learned!!


Famous Pork Chops

1 C. crushed reduced-fat Ritz crackers
garlic salt and pepper to taste
2 eggs, beaten
4 pork chops
several TBS olive oil

1. Preheat oven to 350. Combine crushed crackers, garlic salt and pepper in shallow dish. Dip pork chops in egg batter, then breading mix.

2. Heat olive oil to med-high heat in large skillet. Add pork chops and sear until they have a medium-brown color (1-2 minutes.) Flip and brown the other side.

3. Line a cookie sheet with foil and brush olive oil over the foil. Place pork chops on pan and cook for 20 minutes on one side in the oven. Flip, and bake for another 20 minutes. During the last 10 minutes of cooking, turn heat up to 375 to ensure a nice crispy exterior. Cut into one of the thicker porkchops when done baking, to ensure that they are cooked thoroughly - juices should run clear and center will be a creamy/slightly-pink color.


Sunday, August 9, 2009

Spicy Orange Chicken with Snow Peas and Red Pepper

This recipe comes from a somewhat unique source (when we're talking about my usual recipe sources, at least.) I am one of those people who actually reads every single cookbook I receive, and this includes creating a little chart in the front with page numbers and names of various recipes I will someday make. This recipe comes from a short, somewhat dated cookbook called "All the Best Stir Fries." Published almost 20 years ago without even a single real photo, I got this little book from my mom on one of my summer trips to California during college. Except for the one time when I went through and marked good recipes, I haven't pulled it off my shelf until last week. I wanted something with ingredients that I had in the pantry, and something quick and easy to pull together. This recipe met both requirements. Depending on your pantry, this rule might or might not be true. Since I cook so often, I've always got things on hand such as cornstarch, rice vinegar, chili paste, sesame oil and of course, ginger.

(Hint about ginger: ginger is extremely cheap when bought fresh at the grocery store. I usually buy a medium-sized root, but since I only use a tiny bit at a time, my trick is to chop the ginger into 1/2-inch pieces, put them into a baggie, and freeze. Each time you cook, pull out one piece, let it thaw on the counter for ten minutes, and you've got the perfect amount of ginger for one dish.)

When I first tasted a piece of chicken that was simmering in the pan before I served dinner, I actually said out loud, "Ohmigod!" To me, this recipe tastes very similar to actual Orange Chicken from a chinese restaurant. I hope you all love it as much as I did!

PS - as you can see in the picture, I served this on top of jasmine rice.


Spicy Orange Chicken with Snow Peas and Red Pepper

3-4 boneless skinless chicken breasts, cut into small strips
1 TBS water
1 TBS cornstarch
salt + pepper
3 TBS oil
1/3 C fresh-squeezed orange juice*
grated orange zest from the entire orange*
2-3 tsp sugar*
2-3 tsp rice vinegar*
1 tsp soy sauce*
1 tsp chili paste*
1.5 tsp cornstarch
few drops of sesame oil (a little bit goes a loooong way...don't get too excited with this stuff!)
1 garlic clove*
1 tsp finely chopped ginger*
1 red pepper, cut into thin strips
small bag of snow peas, washed

*the reason I starred these ingredients is because, I rarely (if ever) follow the recipe when it calls for putting together various sauces. We like spicy food, so I used way more than 1tsp chili sauce. I also like sweet sauces, so I used more sugar. My point is, make it how you like it.

1. In ziploc bag, combine chicken, pinch of salt+pepper, cornstarch and water. Let sit for at least half-hour in the fridge, or up to 24 hours.

2. Combine orange juice, orange zest, sugar, rice vinegar, soy sauce, chili paste, cornstarch, and sesame oil. Whisk thoroughly.

3. Heat 1 TBS oil in large skillet. When hot, add red pepper, snow peas and ginger. Ensure your pan is really hot - you want your veggies to get a few spots of brown on them (I recently learned, in Chinese this is called "wok hey" - a few charred spots on the vegetables that you won't achieve if you let them cook more slowly.) Cook for a couple of minutes, tossing frequently. Set hot veggies aside.

4. Add a bit more oil to pan and add chicken. Stir-fry for several minutes until cooked through, with a nice brown color. Add garlic at the last minute - add more oil if necessary so garlic doesn't stick and burn. Return veggies to pan and lower heat; add orange sauce. Stir until everything is glazed in the sauce.

Sunday, August 2, 2009

Turkey Artichoke Paninis


This recipe was inspired by one of our favorite places - Panera. Brett and I have always thought their "turkey artichoke" is just about the best sandwhich ever - served piping hot, and loaded with a creamy artichoke sauce. A few years back, to replicate this sandwich, I wanted to go all out with either an electric grill, or panini maker. I can't remember for which birthday I requested a Cuisinart Griddler, but it has been a great addition to my various kitchen appliances! It has not only "grill plates" (with ridges as any other electric grill would have) but also "flat plates" for eggs, pancakes, etc. It also works great for burgers, steaks, etc.

I re-created this recipe based on ingredients that are in Panera's turkey artichoke sandwich. No, it doesn't taste identical, but that's perfectly ok - there are likely one or two special ingredients which I've missed out on - but I can guarantee that my version is healthier and contains less preservatives/fat. If you don't have an electric grill, its TOTALLY fine - this could easily be done by just sticking the sandwich in the oven until the bread is nice and toasted, and the inside sufficiently warmed.

Lastly, one reason I love this recipe is because it's something Brett and I can do together. Whereas most meals, I cook and he does dishes, this meal is something I put together (i.e. make the sandwiches) and he cooks (i.e. works the griddler.) The very first time I used the griddler, I literally scorched our sandwiches - they were ruined! Since then, I've declared a strict "hand-off" rule: I am not to touch the griddler! A perfect excuse to let Brett do the cooking while I relax! :)


Turkey Artichoke Paninis

loaf of asiago cheese bread
1 lb deli turkey
6 oz cream cheese (we used fat-free and it tastes great)
1/2 can artichoke hearts (in water, not oil)
1 large tomato, cut into thin slices
1 red onion, cut into slices
salt and pepper

1. Carmelize the red onion by sauteeting in a bit of butter or oil until a deep purplish-brown. Taste a small piece - it should be sweet!
2. Finely chop the artichoke hearts and set aside.
3. Take your bread and slice into sandwhich-sized pieces. Spread cream cheese on both the top and bottom slice. Layer your sandwiches with turkey, tomato, artichoke, carmelized red onion, and sprinkle with salt and pepper.
4. Place your sandwiches on the grill, or in the oven, and cook until heated through.